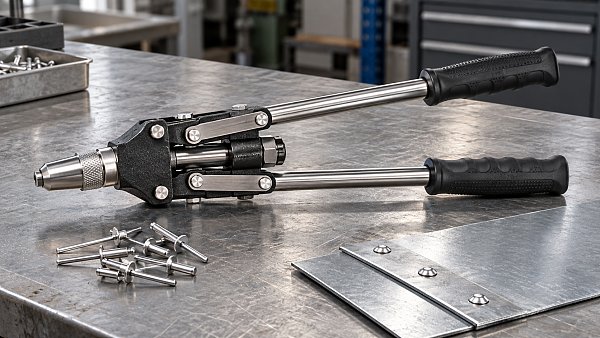
You do not always need a long handle rivet gun for stainless steel rivets. You need a tool explicitly rated for their diameter and material.
Longer handles usually reduce hand effort, making manual installation more manageable. However, they require working clearance and cannot compensate for inadequate jaws, stroke, or capacity.
The right choice depends on rivet construction, access, and installation volume. This guide explains what to check and when a powered riveter becomes more practical.
When does a long handle rivet gun make sense?
A long handle rivet gun is useful when a compatible compact manual tool requires uncomfortable force, particularly during repeated installation of larger stainless steel blind rivets.
Its longer levers provide greater mechanical advantage, reducing the input force needed to pull the mandrel. Many designs use two hands to distribute the effort.
For occasional small rivets, a compact hand riveter may be sufficient. Confirm its stainless steel capacity instead of assuming every manual model needs longer handles.
For larger diameters, long handles often become more attractive. Nevertheless, the manufacturer's material-specific rating remains decisive; handle length alone does not establish suitability for stainless steel.
Access also changes the decision. Inside cabinets, channels, or enclosures, handles may lack room to open fully, preventing an otherwise capable tool from operating properly.
Choose longer handles when they solve an effort problem within the tool's rated capacity. Choose another configuration when clearance or sustained workload is the limiting factor.
Check both the rivet body and mandrel material
In a conventional blind rivet, the tool pulls the mandrel while supporting the rivet flange. This action deforms the body and clamps the joined materials.
At the designed breaking load, the mandrel separates. The required pulling force depends on the complete rivet design, including materials, diameter, and construction.
A rivet described simply as “stainless steel” may have a stainless body and stainless mandrel, or another combination. Read the supplier's complete material designation.
Do not assume a tool rated for aluminum rivets of a certain diameter can install stainless rivets of that diameter. Their setting requirements can differ substantially.
Likewise, compatibility with ordinary blind rivets does not automatically cover structural, sealed, or other specialty designs. Some require specific nose assemblies or dedicated installation tools.
If the packaging lacks construction details, obtain the technical datasheet before selecting equipment. Matching the actual fastener prevents purchasing a tool with misleadingly broad capacity claims.
What specifications should you verify before buying?
Start with an explicit stainless steel capacity statement. A headline such as “up to 1/4 inch” is incomplete unless the manufacturer identifies the supported materials.
Then check the nosepiece, jaw assembly, and any required accessories. A nosepiece that accepts the mandrel does not prove the tool can set that rivet.
For powered tools, compare published pulling force and stroke with the fastener manufacturer's requirements. Maximum force alone does not establish compatibility with every rivet design.
Some manual tools need several handle closures to complete installation. Follow their operating instructions; repeated pulls are acceptable only where the tool and rivet permit them.
Avoid selecting solely by advertised handle length or heavy-duty wording. Clear specifications, replacement jaws, spare nosepieces, and accessible service information provide more useful purchasing evidence.
How should rivet diameter influence your choice?
Diameter is a useful screening factor, but it cannot determine tool selection by itself. Construction and mandrel properties also influence the force needed for installation.
Small stainless blind rivets may be manageable with a compact, appropriately rated hand tool. For occasional work, that can offer convenient access and portability.
As diameter increases, manual effort generally becomes more demanding within comparable rivet families. Longer handles can help, provided the tool explicitly supports that stainless size.
For example, a tool rated for 3/16-inch aluminum rivets may have a smaller stainless capacity. Check both entries before purchasing 3/16-inch stainless fasteners.
Larger stainless rivets, including some 1/4-inch products, may justify powered equipment. Some manual models support them, but compatibility and operator effort require separate evaluation.
When specifications are unclear, give the tool supplier the exact rivet part number. Ask for confirmation of compatibility rather than relying on a diameter-only recommendation.
Will the handles and nose fit your working space?
Before choosing a long handle rivet gun, check the space available with its handles fully open. Closed dimensions can hide the clearance needed during operation.
Also check whether the nose can sit squarely against the rivet flange. An angled approach can interfere with seating and place unwanted loads on the assembly.
Deep recesses may require an approved extended nose assembly. Do not improvise extensions or substitute components unless the tool manufacturer permits that configuration for your fastener.
Think beyond a single accessible hole. A tool may fit the first fastening position but become obstructed by adjacent panels or previously installed components.
Overhead work introduces another concern: tool weight and two-handed operation can increase fatigue. Confirm that the operator can maintain stable support throughout the installation cycle.
For repetitive production, test the proposed tool on a representative assembly. This reveals access problems more reliably than comparing catalog dimensions without considering operator movement.
How to install stainless steel blind rivets reliably
Good results depend on joint preparation as much as leverage. Begin by confirming that the rivet's grip range covers the total thickness being clamped.
Prepare the hole to the fastener manufacturer's specified diameter and tolerance. Deburr the edges, align the parts, and remove chips before inserting the rivet.
Use the correct nosepiece and inspect the jaws according to the tool instructions. Damaged or contaminated gripping components can slip even when nominal capacity is adequate.
Insert the rivet fully and bring the nosepiece squarely against its flange. Keep the joined parts together so the rivet closes the intended joint.
Operate the tool with controlled pressure and follow its prescribed cycle. Do not extend the handles with pipes or apply force beyond the manufacturer's instructions.
After setting, inspect flange seating, joint tightness, and the accessible blind side against the rivet supplier's acceptance criteria. A broken mandrel alone does not prove correct installation.
Wear appropriate eye protection and keep hands clear of closing handles. Collect broken mandrels promptly, using the tool's collection system where one is provided.
What if the mandrel slips or will not break?
Stop when installation requires unexpectedly high force. Continuing to squeeze can damage the tool, disturb the joint, or create a sudden loss of control.
First verify the rivet material and diameter against the tool rating. An aluminum capacity statement is a common source of mistaken assumptions about stainless compatibility.
If the mandrel slips, inspect jaw condition and cleanliness, nosepiece selection, and engagement. Follow the manufacturer's cleaning instructions and replace worn gripping components when required.
If the rivet deforms but the mandrel remains intact, check available stroke, tool condition, and fastener compatibility. Follow the documented procedure for any additional pull.
If the joint stays loose after the mandrel breaks, investigate grip range, hole size, seating, and rivet selection. Additional leverage cannot correct an unsuitable joint design.
Remove and replace suspect fasteners using an approved method. For safety-critical assemblies, follow the applicable inspection and repair procedure instead of relying on appearance alone.
When is a powered riveter the better choice?
Consider powered equipment when installation becomes repetitive, manual effort rises, or consistent production pace matters. There is no universal daily rivet count that determines the switch.
A few awkward overhead installations may create more fatigue than many accessible bench installations. Evaluate posture, required force, handling time, and opportunities for recovery together.
A cordless riveter offers mobility and avoids an air hose. Check stainless capacity, pulling force, stroke, battery weight, and the availability of suitable nose equipment.
A pneumatic-hydraulic riveter can suit an equipped workstation with repeated installation demand. Include air supply requirements, hose routing, maintenance, and mandrel collection in the evaluation.
Powered equipment still requires correct fasteners and preparation. It cannot compensate for an oversized hole, incorrect grip range, or a nose assembly unsuited to the rivet.
Compare total working time and operator comfort during a representative trial. Include battery changes, maintenance, and rework when assessing whether the investment improves the task.
Choose by compatibility first, then effort and access
You need a long handle rivet gun when a compatible manual tool benefits from greater leverage and the working area allows full, controlled handle movement.
You may not need one for occasional small stainless rivets that a rated compact tool handles comfortably. Repetitive or demanding applications may favor powered equipment.
Before buying, confirm the exact rivet construction, stainless diameter rating, nose equipment, and operating clearance. Then test realistic installation effort wherever practical before committing.
The best choice sets the specified rivet correctly while remaining manageable throughout the job. Longer handles help only when they support that complete requirement.