Industry News
Curation by industry experts
Hot Articles
Popular Tags
How custom lighting for exhibition booths shapes product visibility
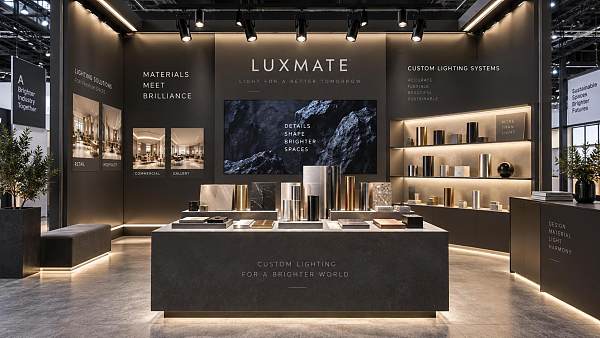
Product visibility at an exhibition is shaped in the first few seconds of viewing. A display can contain excellent samples, clear graphics, and carefully finished materials yet still disappear into a busy hall if its lighting does not establish hierarchy. Custom lighting for exhibition booths gives the space a deliberate visual order: the primary product receives attention first, supporting information remains readable, and the surrounding structure does not compete with the message.
The useful starting point is to define what must be seen from each distance. A product seen across an aisle needs a different lighting treatment from a product examined at arm's length. Large equipment, reflective hardware, textiles, packaging samples, furniture surfaces, and illuminated displays each reveal quality through different visual cues. A lighting plan that simply increases brightness often creates glare, washed-out graphics, deep shadows, or an uncomfortable viewing environment. Visibility comes from controlled contrast, appropriate color rendering, beam direction, and a layout that works with the booth's actual materials.
Build the lighting hierarchy around the product
Every booth has competing visual elements: suspended signs, printed walls, shelving, screens, counters, decorative finishes, and neighboring exhibits. Lighting should separate these elements by importance rather than treat the entire footprint as one uniformly lit room. Start by identifying a focal zone, then assign lower visual emphasis to circulation areas and background surfaces.
For a product launch, the focal zone may be a plinth, demonstration bench, or enclosed display case. For a broad product range, the focal point may be a sequence of product bays with a clear order. Accent luminaires should create enough difference between the product and its immediate background for the eye to recognize the subject quickly. That difference is often more effective than raising the general booth illumination.
A useful approach is to layer the light:
- Ambient light establishes safe, comfortable orientation across entry points, meeting areas, and circulation paths. It should be sufficient for reading printed material and navigating the space without flattening every display surface.
- Accent light directs attention to products, prototypes, graphics, or material samples. Narrower beams create visual emphasis, while broader beams suit larger objects or grouped displays.
- Vertical light supports the walls, shelving faces, and signage that visitors read from the aisle. A bright floor with dim graphics often feels poorly lit even when the measured light level is high.
- Functional light belongs at worktops, product demonstrations, storage access points, and equipment interfaces. It should serve a task without spilling into the presentation zone.
These layers should not be designed in isolation. A strong spotlight aimed at a product can be ineffective if a glossy printed wall directly behind it reflects the same source toward the viewer. Likewise, a luminous screen placed beside a subtly lit sample board may overpower the sample, even though the board itself is technically well illuminated.
Match beam control to product geometry
Beam angle is often discussed as a fixture specification, but its practical value depends on mounting height, aiming distance, product size, and the amount of spill light the booth can tolerate. A narrow beam can produce a precise highlight on a small object, but it becomes difficult to maintain when products are moved or when a fixture is mounted close to the target. A wider beam gives better coverage but may illuminate adjacent products, background panels, or the aisle.
Long, narrow products such as rails, handles, linear lighting components, or rolled textile samples usually need multiple overlapping sources rather than one central spotlight. A single source tends to create a bright center and weak ends. Large furniture pieces benefit from lighting that describes form from more than one angle; otherwise, the front plane appears bright while side textures and joinery disappear.
For shiny surfaces, the viewer sees reflections of the luminaires rather than the object itself. Polished metal, glass, lacquered panels, chrome fittings, and glossy packaging require careful placement outside the most direct reflection path. Moving the fixture slightly off-axis can preserve edge definition and reduce distracting hot spots. Diffused linear sources or broad soft light can reveal surface finish better than a tight point source, especially on curved or highly reflective objects.
Color quality affects whether materials look credible
Color temperature changes the perceived character of products and finishes. Warm light can make timber, leather-like surfaces, and some decorative materials appear richer, but it may shift the appearance of neutral white packaging, cool metals, or technical products. Cooler light can support a clean, precise presentation, though an overly cold environment may make fabric, skin tones, and warm finishes look dull.
Color rendering is equally important. A fixture with poor spectral quality can make colored textiles, printed packaging, painted surfaces, and food-related displays look inaccurate even when the light level seems adequate. The concern is not simply whether a lamp is described as bright or white. The source must reveal differences among closely related colors and allow viewers to judge finish, print density, surface cleanliness, and product consistency.
Mixed sources introduce another problem. If integrated shelf lighting, ceiling spotlights, video walls, and neighboring booth light all have noticeably different color characteristics, a product can look different depending on where it sits. This is particularly disruptive when products are compared side by side. Specify a coordinated color temperature and confirm that the selected fixtures produce a similar visual result, rather than relying solely on labels in a product catalog.
Demonstration areas deserve separate consideration. If an item will be photographed, inspected closely, or shown on camera, the lighting needs to support both the in-person view and the camera image. Some LEDs can interact poorly with camera shutter settings, creating flicker or banding. Testing the intended fixture with the planned recording equipment before installation prevents a problem that is difficult to hide during the event.
Use contrast without creating discomfort
Visibility requires contrast, but excessive contrast exhausts the eye and makes adjoining areas look neglected. A very dark booth with isolated bright products can work for a controlled premium display, yet it is less effective where visitors need to read specifications, compare samples, or hold conversations. Brightness transitions should feel intentional. The route from aisle to reception, product zone, and meeting space should not force repeated adjustment between glare and darkness.
Glare has two forms that are often confused. Direct glare occurs when a bare lamp, bright lens, or screen sits in the viewer's normal sightline. Reflected glare appears when that source is mirrored on a product surface, countertop, glass partition, or glossy wall. Shielding, louvers, recessed mounting, and adjusted aiming can address direct glare. Reflected glare requires a different response: changing the source position, modifying the product angle, or using a larger and softer source.
Overhead truss layouts can also create visible scallops, shadow bands, or isolated pools of light on wall graphics. These effects are sometimes desirable on textured panels, but they can make technical diagrams and brand marks difficult to read. Wall washers or carefully spaced linear fixtures produce a more consistent result when graphics carry essential product information.
Coordinate lighting with the physical booth build
Lighting decisions affect fabrication long before the venue opens. A fixture may require concealed cable paths, access panels, mounting plates, transformer locations, ventilation clearance, or reinforced sections within a ceiling feature. Leaving these details until final installation often leads to exposed wiring, poorly aimed fixtures, or last-minute substitutions that change the visual result.
Materials determine what can be safely and cleanly integrated. Fabric tension walls diffuse light differently from rigid acrylic panels. Dark matte laminate absorbs stray light and supports contrast, while glossy laminate can turn every fixture into a visible reflection. Perforated metal, slatted timber, and open shelving create their own shadow patterns. A lighting drawing should therefore be reviewed with the final finish schedule, not only with a simplified booth rendering.
Transport and assembly conditions also shape the specification. Fixtures intended for repeated exhibition use need protected lenses, robust connectors, clearly labeled cables, and mounts that can be re-aimed without damaging finished surfaces. Integrated lighting should be divided into logical circuits so a single fault does not darken the entire product wall. Spare drivers, replacement lamps where applicable, and basic aiming tools should remain accessible rather than being sealed behind permanent finishes.
Resolve power and control early
A visually strong concept can fail when available power, venue connection points, ceiling restrictions, or electrical approval requirements are confirmed too late. The lighting load should be calculated alongside screens, interactive displays, refrigeration, demonstration equipment, and other booth services. LED fixtures reduce load compared with older technologies, but power distribution still matters when many small sources, drivers, and display systems operate together.
Dimming adds flexibility, particularly when ambient hall conditions are uncertain. However, dimming compatibility must be verified across the driver, fixture, control method, and venue supply. A control system that works in a workshop test may flicker, reset, or behave unpredictably once connected to different electrical infrastructure. Simple, accessible controls are often more reliable than an elaborate scheme that cannot be adjusted quickly during setup.
Emergency access, cable routing, and heat management should remain visible in the technical plan. Decorative ceiling elements can trap heat around drivers and reduce service access. Power supplies placed inside sealed display furniture may become difficult to replace. These are small coordination details, but they directly influence whether the final illumination remains stable through the full exhibition schedule.
Test the scene as visitors will experience it
Renderings and fixture data sheets are useful, but they do not reveal every visibility issue. A practical mock-up should include the actual product or a representative surface, the intended background material, printed graphics, and at least one viewing angle from the aisle. Test from standing height, from close inspection distance, and from the path visitors will take through the booth.
During setup, aim fixtures after major booth surfaces, products, and screens are in their final positions. A spotlight aligned to an empty plinth is rarely correct once the real object is installed. Observe whether labels cast shadows, whether glass shelves create repeated reflections, and whether adjacent displays compete for attention. Photographing the scene under event-like conditions is useful because camera images expose overexposed highlights and uneven color that may be less obvious to the eye.
The completed scheme should make the product easy to find, easy to inspect, and visually consistent with the intended level of quality. When every light source has a defined purpose, custom lighting becomes part of the product presentation itself rather than a decorative layer added after the booth is built.
Recommended News
 Commercial LEDHow custom lighting for exhibition booths shapes product visibilityCustom lighting for exhibition booths enhances product visibility with strategic contrast, accurate color, glare control, and focused display design. Discover practical planning insights.Commercial Tech EditorSep 15, 2026
 Carton & PlasticsWhen do double wall corrugated boxes prevent damage in transit?Double wall corrugated boxes prevent transit damage from stacking, impact, punctures, and long-haul handling. Learn when stronger packaging delivers smarter protection.Packaging Supply ExpertSep 14, 2026
 Carton & PlasticsHow to assess a flat bottom pouch supplier’s quality controlsFlat bottom pouch supplier quality controls: assess materials, seal integrity, traceability, change management, and release processes to reduce packaging risk.Packaging Supply ExpertSep 13, 2026
 Office FurnitureHow to compare wholesale commercial carpet tiles by installed costCommercial carpet tiles wholesale: compare installed costs, freight, waste, subfloor prep, labor, and lifecycle value to make smarter procurement decisions.Interior Sourcing LeadSep 12, 2026