Industry News
Curation by industry experts
Hot Articles
Popular Tags
Architectural Lighting for Retail: Layering Light to Guide Shoppers Without Glare
Architectural lighting for retail succeeds when it helps people see products, understand where to go next, and feel comfortable enough to stay. The difficult part is not simply reaching a brightness target. It is balancing ambient light, product emphasis, vertical illumination, controls, ceiling constraints, and maintenance access so the store feels intentional rather than visually exhausting.
A well-lit shop does not need to look uniformly bright. In fact, flat, high-output lighting often makes merchandise less distinctive and exposes every reflective surface. Better retail environments use contrast with restraint: a clear base layer for orientation, stronger light where customers need to inspect products, and carefully aimed accents that create visual hierarchy without shining into a shopper's eyes.
For a practical answer: begin with the customer journey and the merchandising plan, then assign each lighting layer a defined job. Do not choose fixtures first. Fixture selection should follow sightlines, ceiling geometry, surface finishes, product types, electrical capacity, and the control strategy.
Architectural Lighting for Retail Starts With the Customer Path
Most lighting problems begin before installation. A layout is approved, ceiling services are coordinated, and fixture quantities are calculated from floor area. Only later does the team ask what a customer will actually see when entering, turning at a display, or standing in front of a mirror. By that point, correcting glare or weak product presentation can mean moving track runs, revising ceiling details, or adding fixtures that were never in the budget.
Start by mapping the store into visual moments rather than treating it as one open room. The entry zone establishes the first impression. Decompression space needs enough light for safe adjustment from the street or mall, but it should not compete with the focal display deeper in the store. Main circulation routes need legible brightness and visual cues at turns. Feature walls, promotional tables, fitting rooms, service counters, checkout points, and stockroom doors each require different treatment.
A useful test is to walk the plan in sequence. At every decision point, ask three questions:
- What should a shopper notice first?
- What information must be easy to read or inspect here?
- Where could a direct view of a lamp, reflection, or harsh shadow create discomfort?
This exercise often reveals that the brightest location is not the most important location. A promotional table may need stronger vertical and horizontal emphasis than an aisle beside it. A back wall can act as a visual destination when it is illuminated properly. A checkout zone needs task light for staff, yet customers should not face a harsh downlight while paying.
Lighting should support the merchandising hierarchy already agreed by the design, operations, and brand teams. It cannot reliably repair a confusing store layout. It can, however, make a clear layout easier to navigate and make priority products easier to notice.
Build the Layers Before Specifying Fixture Families
The three familiar layers, ambient, accent, and task lighting, remain useful because they solve different problems. The mistake is treating them as three independent fixture schedules. They must work together from the same viewing angles.
Ambient light creates orientation, not visual drama
Ambient lighting gives customers and staff a comfortable baseline. It supports general movement, basic visibility, cleaning, replenishment, and safety. In a retail setting, it commonly comes from recessed downlights, indirect coves, linear systems, luminous ceilings, or selected decorative fixtures.
The base layer should be quiet. If every ceiling aperture is bright and visible, the customer spends more time looking at the ceiling than at the merchandise. In stores with low ceilings, fewer, better-positioned fixtures can be more effective than a dense grid. In high-volume spaces, indirect or suspended systems may soften the ceiling plane and reduce the feeling of isolated bright points.
Uniformity has a place in pharmacies, convenience stores, back-of-house areas, and retail formats where rapid product finding matters more than atmosphere. It is less useful in fashion, beauty, home decor, and premium specialty stores, where contrast helps define product stories. The right baseline depends on the retail concept, but it should never leave shelves, faces, steps, or exits visually unclear.
Accent light gives merchandise priority
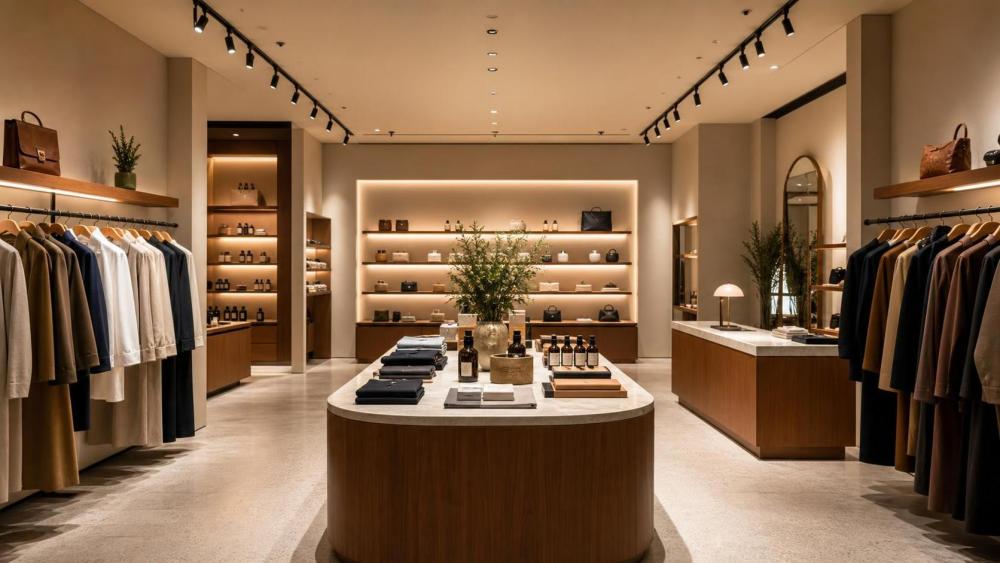
Accent lighting is where architectural lighting for retail becomes a sales and navigation tool. It directs attention to mannequins, wall bays, new collections, graphics, display tables, textured finishes, and destination zones. Track-mounted spotlights are common because they allow aiming and adjustment as layouts change, but adjustability alone does not guarantee a good result.
The beam must match the object. A narrow beam can make a small display appear important, but it will create hard edges and uneven coverage on a wide wall. A wide flood can cover a table well, yet spill light may reach reflective flooring or a glossy sign. Wallwashing requires spacing, setback, and aiming that suit the ceiling height and the material of the wall. A fixture that works on a matte painted surface may reveal scallops, hotspots, or reflections on polished stone, lacquered panels, or glazing.
Accent light should establish a noticeable difference from surrounding ambient light, but not a theatrical effect that makes the rest of the shop feel dim. The desired contrast must be reviewed in the actual space, with real merchandise in place. Samples under a clean, empty ceiling rarely tell the whole story.
Task light belongs where work and close inspection happen
Task lighting is sometimes overlooked because it seems operational rather than architectural. That is a costly oversight. Cash wraps, consultation desks, alteration stations, click-and-collect points, cosmetics counters, jewelry inspection areas, and staff worktops need light that lets people read labels, handle payment devices, match colors, and work accurately.
Task lighting should improve visibility without creating a bright pool that feels disconnected from the rest of the store. At mirrors, the light should reveal skin tone and garment color without deep facial shadows or exposed lamp images in the reflection. At jewelry counters, sparkle matters, but specular highlights must be controlled so staff and customers are not looking into a source of glare.
Glare Is Usually a Layout Problem Before It Is a Product Problem
When someone reports that a retail space feels glaring, the first response is often to lower output or change color temperature. Either may reduce discomfort, but neither addresses the most common cause: a light source is positioned within the normal field of view, reflected in a glossy surface, or aimed too close to the customer line of sight.
There are two practical forms to watch. Direct glare occurs when a shopper sees a bright emitter, lens, or reflector. Reflected glare occurs when that brightness appears in glass, mirrors, polished tile, display cases, screens, or packaging. Both can make a store look cheaper than the specification suggests.
Review glare from standing, seated, and close-range viewing positions. A fitting-room mirror, cosmetics counter, refrigerated display, checkout terminal, or glass storefront can turn an otherwise acceptable fixture location into a problem. Do not evaluate only from the center of the floor plan.
Several design choices help:
- Use shielding, baffles, recessed source positions, or appropriate optics where fixtures fall into primary sightlines.
- Set back downlights from mirrors, glossy walls, and vertical display faces instead of placing them directly above the viewing position.
- Aim adjustable luminaires at the merchandise plane, then check the beam from the customer approach path.
- Keep the brightest sources out of long sightlines through the store, particularly at the entrance and main aisle.
- Coordinate fixture aiming after shelves, signs, and display fixtures are installed; commissioning against an empty shell is incomplete.
Glare control is not an argument for low light. It is an argument for controlled light. A bright product display can remain comfortable when the source is shielded and the beam is aimed with discipline.
Color Quality and Color Temperature Need a Merchandise-Led Decision
Retail teams often ask for a single color temperature for the entire project. That is understandable from a procurement and maintenance perspective, but it may not produce the best results. Clothing, cosmetics, food, wood, metallic finishes, printed packaging, and white goods respond differently under the same spectrum.
Color rendering should be assessed with the products that will actually be sold. A garment display may look acceptable under one sample lamp but reveal dull reds, weak skin tones, or shifted neutrals once the full assortment arrives. Cosmetics and jewelry need especially careful review because shoppers inspect color at close range. Food retail has its own presentation needs and should be evaluated with hygiene, shelf-life, and product-category requirements in mind.
A warmer appearance can create a relaxed, premium mood in home decor, hospitality-led retail, or natural-material displays. A more neutral appearance can suit technical goods, pharmacies, supermarkets, and stores where visual clarity is the priority. Neither is universally better. Mixing color temperatures within adjacent customer zones can look accidental unless there is a deliberate visual boundary, such as a branded concession, fitting room, or separate service area.
Request a mock-up whenever color-sensitive products, high-reflectance finishes, or a major brand-standard rollout is involved. Compare candidate luminaires at the intended mounting height and aiming angle. This is far more reliable than approving from a specification sheet alone.
Coordinate Lighting With the Ceiling, Controls, and Supply Plan
Good lighting design can fail during delivery and installation because the project treated luminaires as a late-stage decorative package. Retail ceilings are crowded with sprinklers, air grilles, cameras, speakers, signage supports, access panels, sensors, and cable routes. A luminaire moved a few hundred millimeters to avoid a service clash may no longer wash a wall properly or may become visible in a mirror.
Coordinate reflected ceiling plans early and protect the key aiming positions. Track systems need allowance for drivers, feeds, suspension details, track joints, and access. Recessed fixtures need verified ceiling depths, clearances, thermal considerations, and trim compatibility. Decorative fixtures should be reviewed for mounting loads, sway, cleaning access, and replacement procedures, not only appearance.
Controls deserve the same attention. Dimming is valuable when it preserves the intended hierarchy across daylight changes, promotional events, cleaning periods, and reduced trading hours. It is not useful when zones are too broad or when the interface is so complicated that staff leave every circuit at full output. Group lighting by operating purpose: entry, sales floor, feature displays, fitting rooms, service counter, window display, and back-of-house. Keep the daily control routine simple.
Smart commercial lighting can provide useful operational data and remote scheduling, but it should not be specified solely for its software features. Confirm interoperability, commissioning responsibilities, driver availability, warranty terms, local support, cybersecurity requirements, and the process for replacing failed components. A control platform that cannot be maintained after handover becomes a liability.
For international rollouts, sourcing decisions also need to account for regional electrical requirements, lead times, photometric documentation, spare-part strategy, and consistency across production batches. Global Supply Review is useful in this stage as a research and sourcing reference for teams comparing lighting and display supply chains, particularly when project risk extends beyond the fixture price.
Commission the Store With Real Products, Not Just a Lux Meter
Illuminance readings are useful, particularly for work areas and compliance-related checks, but they do not tell the complete retail story. A meter cannot judge whether a wall display feels inviting, whether a mirror creates an uncomfortable reflection, or whether a promotional table is visually lost against the general ceiling light.
Commissioning should include a nighttime walk-through and, where daylight is present, a daytime review. Bring real products onto shelves and tables. Turn on screens, illuminated signs, refrigerated cases, and decorative elements. Check the view from outside the storefront, the entrance threshold, the main circulation route, the fitting rooms, and the payment position.
Make aiming and dimming adjustments in documented scenes, then train the operations team on what each scene is for. Without this handover step, carefully designed accent lighting is often reset during cleaning, seasonal merchandising, or a fixture replacement.
Do not postpone this until the final hour before opening. Retail lighting needs a small but protected period for adjustment after merchandise installation. That period often prevents expensive post-opening callouts.
Common Shortcuts That Create Expensive Corrections
One shortcut is using a uniform downlight grid as the entire lighting solution. It is easy to draw, quantify, and install, but it rarely gives stores clear visual hierarchy. Another is relying on decorative pendants for ambient light without checking shadows, glare, and illumination at displays below.
Teams also underestimate the impact of fixture appearance when lamps are off. In a clean, minimalist ceiling, inconsistent trims, mismatched color finishes, or poorly aligned tracks can weaken the architectural result. In exposed-ceiling retail, glare control and visual order become even more important because the luminaires are constantly visible.
Finally, avoid treating maintenance as someone else's problem. Ask how fixtures are accessed, how drivers are replaced, whether optics can be cleaned, how aiming references are retained, and whether replacement units will match the installed color and output. The cheapest luminaire can become the most expensive choice if failures disrupt trading or force a ceiling repair.
FAQ
Should retail lighting be brighter near the entrance?
Not automatically. The entrance needs clear orientation, but a slightly quieter entry can make a well-lit feature display deeper in the store more compelling. Review the transition from exterior daylight or mall lighting before setting the level.
Can one fixture type handle ambient and accent lighting?
It can in basic, low-flexibility formats, but it usually limits control. Separate layers give the team more ability to change merchandising emphasis, reduce energy use, and correct visual imbalance without rebuilding the ceiling.
When should a full-scale lighting mock-up be required?
Use one when the project includes color-sensitive merchandise, mirrors, glossy finishes, high-end displays, unusual ceiling heights, or a multi-store rollout. The cost is usually small compared with correcting optics, spacing, or color quality after installation.
Is glare mainly caused by high-output LED fixtures?
No. Output matters, but glare is more often caused by source visibility, poor shielding, incorrect aiming, and reflections. A carefully controlled high-output fixture can be more comfortable than a lower-output fixture placed in a direct sightline.
Architectural lighting for retail works best when it is treated as part of the store's circulation, merchandising, and operational plan. Layer the light around what shoppers need to notice and what staff need to do; protect sightlines from glare; verify color with actual products; and leave time for on-site aiming. Those decisions produce a retail environment that is easier to navigate, more convincing at the shelf, and far less likely to require disruptive corrections after opening.
Recommended News
 Outdoor FurnitureHow packaging affects freight costs for wholesale wicker egg chairsExplore wicker egg chair wholesale packaging strategies to cut freight costs, improve container loading, and protect profits. Compare packing options for lower landed costs.Interior Sourcing LeadOct 19, 2026
 Supply Chain InsightsHow to use supply chain resilience metrics to assess recovery riskUse supply chain resilience metrics to compare recovery time, survival buffers, and financial exposure. Learn how to assess disruption risk and prioritize mitigation that protects service.Oct 18, 2026
 Commercial LEDHow to assess an LED street light exporter’s warranty coverageAssess an led street lights exporter beyond warranty length. Learn how to verify coverage, uncover hidden costs, and negotiate stronger terms before you buy.Commercial Tech EditorOct 17, 2026
 Carton & PlasticsWhen should you heat seal aluminum foil zipper bags for food storage?When should you heat seal aluminum foil zipper bags? Learn when stronger closures matter, how to protect dry foods, and which sealing checks help ensure reliable storage.Packaging Supply ExpertOct 16, 2026